Running Bevel DLT hyperledger fabric network on minikube
Pre-requisites
Before proceeding, first make sure that you’ve completed developer pre-requisites.
Setup minikube
Setup a Ubuntu 20.04 VM with atleast 16 GB RAM, 8 vcpu and having a public ip address, either on any cloud provider or local machine
1.1 How to set and get a public ip address of VM, one needs to check associated cloud provider documentation. For example: azure
OR
1.2 Use local machine of similar configuration and get the instance public ip
Install minikube using instruction here and start minikube.
minikube start --memory 12000 --cpus 4 --kubernetes-version=1.19.1 --apiserver-ips=<specify public ip of VM>
Start a proxy which is required for ansible controller(to be created later in following steps) to access the minikube k8s
docker run -d --network minikube -p 18443:18443 chevdor/nginx-minikube-proxy
Clone forked repo
If you have not already done so, fork bevel and clone the forked repo to your machine.
git clone git@github.com:<githubuser>/bevel.git
Update kubeconfig file
Create a
buildfolder inside your Bevel repository:cd ~/bevel mkdir build
Copy ca.crt, client.key, client.crt from
~/.minikubeto build:cp ~/.minikube/ca.crt build/ cp ~/.minikube/profiles/minikube/client.key build/ cp ~/.minikube/profiles/minikube/client.crt build/
Copy
~/.kube/configfile to build:cp ~/.kube/config build/
Open the above config file in build directory and update file path for certificate-authority, client-certificate and client-key to point to the respective files copied in build directory.
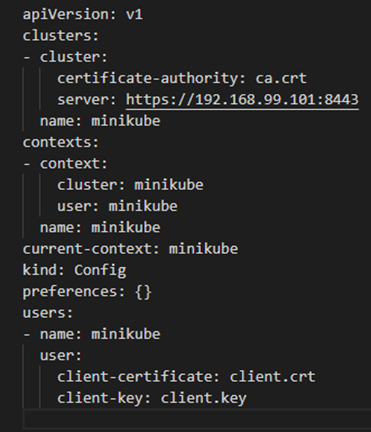
Update config
servervalue to following:server: https://<specify public ip of VM>:18443
If a VM is created on any cloud provider please ensure that required ports are open for traffic.
NOTE: If you ever delete and recreate minikube, the above steps have to be repeated.
Setup Hashicorp vault
There are two options to setup vault:
Install the vault using Hashicorp Vault official documenation
OR
Install vault using helm charts, please watch this video from 17:17 minutes from this Bevel workshop series here
Edit the network configuration file
Copy the sample network yaml file to create the fabric network
cd ~/bevel
cp /platforms/hyperledger-fabric/configuration/samples/network-proxy-none.yaml build/network.yaml
Update Docker configurations:
docker:
  url: "ghcr.io/hyperledger"
  # Comment username and password as it is public repo
  #username: "<your docker username>"
  #password: "<your docker password/token>"
For each
organization, update ONLY the following and leave everything else as is:vault: url: "http://<Your Vault local IP address>:8200" #This could be either public VM address or load balancer when using helm charts root_token: "<your vault_root_token>" gitops: git_url: "<https/ssh url of your forked repo>" #e.g. "https://github.com/hyperledger/bevel.git" git_repo: "<https url of your forked repo without the https://>" #e.g. "github.com/hyperledger/bevel.git" username: "<github_username>" password: "<github token/password>" email: "<github_email>"
NOTE: If you have 2-Factor Authentication enabled on your GitHub account, you have to use GitHub token. Otherwise, password is fine.
How To Generate GitHub Token
On GitHub page, click your profile icon and then click Settings.
On the sidebar, click Developer settings.
On the sidebar, click Personal access tokens.
Click Generate new token.
Add a token description, enable suitable access and click Generate token.
Copy the token to a secure location or password management app.
For security reasons, after you leave the page, you can no longer see the token again.
Deploying the sample “supplychain” chaincode is optional, so you can delete the “chaincode” section. If deploying chaincode, update the following for the peers.
chaincode:
  repository:
    username: "<github_username>"
    password: "<github_token>"
Now run the following to deploy Fabric network on minikube:
Make sure that minikube and Vault server are running. Double-check by running:
minikube status
vault status
Create an ansible controller
cd bevel
docker build . -t bevel-build
Login an ansible controller
docker run -it -v $(pwd):/home/bevel/ bevel-build /bin/bash
Ensure that git config is setup
git config --global user.name "UserName"
git config --global user.email "UserEmailAddress"
Execute the scripts to setup Hyperledger fabric network
cd bevel
./run.sh
Troubleshooting
Ansible controller could not access kubernetes or vault
Please make sure that VM has a public IP and required ports are open. One can verify vault status or accessing K8s using kubectl commands
Clean up the installation
minikube delete --all
docker image rm -f chevdor/nginx-minikube-proxy
sudo apt remove vault